Creating and Revising and Enriching CDASH Items
At this stage in the development of CDASH, almost all of the content of Place and Document items has been generated by our semi-automated processing of batches of Place and Document items with associated media. This process generates CSV tables which are imported through the CSV Bulk Import Module.
As you would expect, we are encountering situations that call for fixing issues and operating on items by hand, using the standard Omeka interfaces for creating and editing items.
There are several scenarios where revising items is necessary:
- Changing the location or title of a Place Item and the associated documents
- Splitting or Merging Place Items and Bulk-re-assignment of Child Documents to new Places
- Correcting or enriching properties of items.
- Creating Place and Document items or Folders from scratch
Many of the techniques necessary for accomplishing these tasks are simple Omeka Adminstrative methods that may be learned by reading the following sections in the Omeka User Documentation.
Learn More about Omeka Items and Properties
These topics from the Omeka-S User Manual provide n-depth information about Omeka Items:
- Items What they are and how to create and edit them.
- Item Sets CDASH folders are associated with Item Sets.
- Resource Templates The metadata skeleton for Items and their properties.
- Custom Vocabulary Module
- Media The content of document items is stored as Media.
Special CDASH Functions and Features that You Should Know
As a CDASH administrator or contributor, a familiarity with Omeka is essential. But it is also important to understand specific assumptions and affordances that are particular to CDASH.
Getting Started: Practice in the Stage Instance
The Stage instance of CHCOmeka http://chcomekastage.azurewebsites.net is where we upload and preview batches of items before uploading them to production. Practice your editing techniques before attempting to carry them out on the live production instance. You can create, modify and edit items in stage, and test your results without any worry of damaging anything, since all of the items in stage can and will be wiped out with each new batch of items that are updated.
Logging in and the Admin View
To create and update items in Stage or Production you must be logged into an account with editing privileges. To access the log-in page, enter the URL for the CHCOmeka server with /admin after the ursl, e.g. http://chcomekastage.azurewebsites.net/admin
Once logged in, you wil be at the Omeka Admin interface, where you wil lhave access to all of the tools for creating Items and Item-Sets (folders). You should also notice that you can go back to view items the the CDASH theme by going back to the bare URL. When you are logged in as an administrator, you will notice that you have the admin toolbar accessible at the bottom of each item show page.

The Admin Bar is a convenient way to access the Edit functions for a particular item. You also ca use the View button to get a view of the values for item propertes such as streetSort that do not appear in the CDASH show page for items. The admin bar also happens to be the only place where ou can find the GeoSync button (Place-Document Information eXchange), which we will discuss in more detail below.
Essential, Optional and Deprecated Item Properties
When a Place or Document Item is opened for editing, one is presented with lots of properties that are not normally seen in the user view. Most of these items are optional. The properties that will be discussed in this how-to guide will cover the minimum requirements. You can look up the ways that any property is expected to be filled out in the data dictionaries:
Every CDASH Document or Place Must have a Mapping Place Marker
Each CDASH Place and Document Item should be associated with a location. The location can be established or adjusted through the Mapping tab located on the edit page for the item.
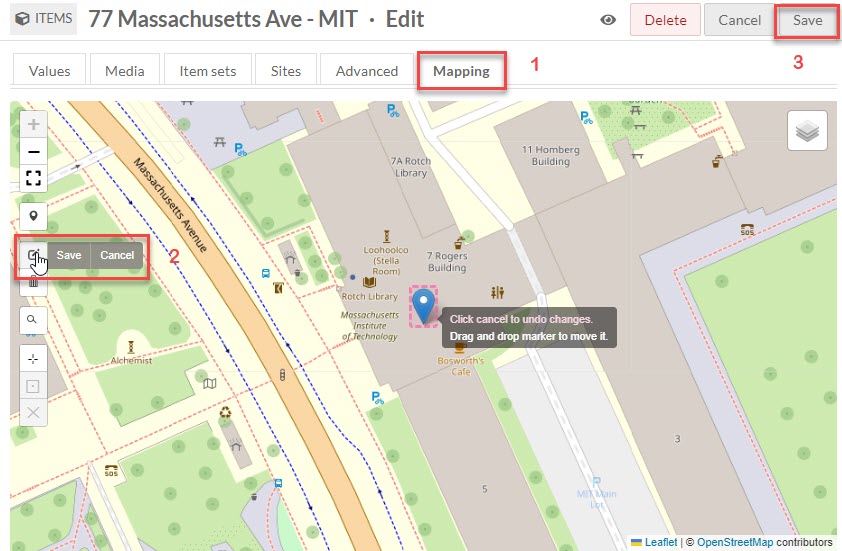
Note that in order to save a new location for a marker, you first have to register the move by clicking Save next to the Marker tool, and then push Save at the top right corner of the Edit page.
Even though the precise location of Document place markers is managed with the GeoSync function, described below, document items must have a place marker to begin with.
Syncing Document Locations with the CDASH GeoSync Function
Since you may have many documents associated with a place, we have created the GeoSync function. Once you have successfully changed the location for a place item, you can check that it has moved by holding down the Shift key and refeshing the CDASH page. Then push the GeoSync button on the CDASH Admin Bar. Refresh your page again and click a couple of Document Items to confirm that they have all been moved.
Place Item references and Automatic Document Item Titles
When editing Document Items, you will notice that the Place Item property is specifirs by selecting an Omeka Place Item resource. When editing Place Items, you will that the Place Item is a text string that controls the ditle of the place item. These Place Item titles should be unique, when they are duplicated, it becomes very difficult to choose the correct place item to associate with a document.
Titles of CDASH Document Items are constructed as a concatenation of the name of the document's Place Item, and the Document's Document Type property. The CDASH theme includes a special hack that construct's these titles automatically when the place resource has been updated.
CDASH Folders
Folders in CDASH are implemented through the mechanism of Omeka Item-Sets.
When editing or creating an item, you can add or remove folders by clicking the Item-Sets tab at the top of the edit page. Note that the listings for Folder among the ordinary properties of Place or Document items was created as a side-effect of the bulk upload process, and it is not necessary to edit these or to keep them in sync with the folders listed as Item-Sets.
Each CDASH Document Item should be included in just one Folder. CDASH Place items should be included in at least one Folder, but a place may appear in several folders. For example, the named place, City Hall is associated with documents that reside in several thematic folders.
Future Linking of Place Properties for Documents
We are working on the automatic synchronization of the Plase properties of documents. For example, the Address, Neighborhood, and Research District properties for a Document, should be automatically determined by the corresponding propertie of each document's associated place. For now, these spatial properties are included as independent values for Document Items. If you find yourself in a situation where a Place Item moves or must be associated with a different neighborhood, you may need to update the associated documents using the bulk editing tools described below.
Bulk Item Editing
There are cases when you may want to select a group of items (for example all of the items of type Document, that reference a particular Folder) and then do something to each of these, such as assign them to a new Named Place. It is possible to do this using the Advanced Search interface to make a selection and then you can change the values of any property for the selected set using Batch Edit