CDASH Application Setup
The deliverables from the CDASH project include a Containerized Web Application that can be deployed on a web services provider like Amazon or Azure. The same container architecture can us used to install a complete instance of CDASH on a local computer for development purposes.
About Names: You will notice that we prefix certain file names and service names with CHC rather than CDASH. This is because we can think of CDASH is one collection within the Historical Commission's greater Omeka installation. Even though CDASH is the first and only collection at the moment, it is foreseeable that the CHC's Omeka installation may eventually host other collections.
Topic Index
Building the CDASH Application from Scratch
We will describe the building the development set-up for Omeka with CDASH customizations. This is si,ilar enough to building the production instance. The action begins with Docker Desktop set up on the computer. The CHCOffLine and CHCPersist folders exist as described above.

Set up volume for persistent files and scans
Containerized applications are designed to re-build themselves from an image periodically. In our installation, we want to be able to save certain resources which are normally installed in the image file-system. To accomodate this, we create a persist file system, that will be the home of three of the folders that are normally installed with Omeka-S, namely.
Persist
- files: which holds the media thumbnails
- config: Omeka config files
- theme: A default omeka thema and our CDASH custom theme.
Scans
Depending on whether you are preparing a development server on your desktop or a production server on a cloud host, you will have different mechanisms for setting up bind mounts . You can see hints as to how these will be set up in the docker files for the dev or production set up. For the development image, you can see how this is handled in cdash-dev-docker/docker-compose.yml. In production, these mounted volumes are prepared as storage containers which are mounted to the web app through the azure portal.
One difference between the dev and the production containers is that the persist volume for dev contains the modules folder so that the develop[er can fiddle with modules. For performance reasons, omeka modules are installed in the image itself.
Set Up Docker Resources
Download the latest version of Omeka-S and unzip it in a temp folder so that we can take some resources out of it. Grab the contents of the Config folder and the Themes folder and Files. Using your computer's command shell, get yourself into the cdash-docker-dev-x.x.x folder and run:
%> docker image build -t cdash-omeka-dev-4.0.4 .
This will create a container that is a Debian Linux server that is running the Apache web server and has all of the PHP gizmos and settings to run Omeka-S -- which is also installed by essentially unpacking a zip file.
Omeka needs to point at an implementation of the MySQL database server that is on an accessible network. We can create the database server as another Docker container. The file, docker-compose.yml includes the instructions for doing this. We use a ready-rolled docker image for MariaDB, and set another server to run Adminer -- which is a MYSQL administrator tool that is also written in PHP.
All of this is snapped together by running the following command in your docker shell:
%> docker-compose up -d
If you have updated your version of Omeka, then you probably wil change the tag used in your Docker image build command, above. And you will also edit the reference to this image in your docker-compose.yml file.
Adminer and the Omeka Database
Starting the docker machine and configuring containers:
- PHP -enabled web server with Omeka installed,
- A MariaDB database server
- the Adminer adminstritative toolkit for MariaDB
Gets you an empty Omeka instance.
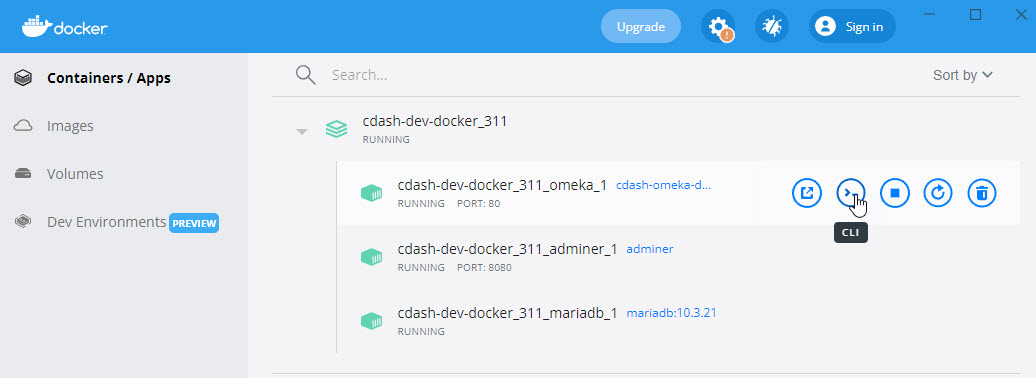
You now should now be able to go to your docker control panel and find the CDash Docker web application that has three containers. The image below shows how to launch the command line prompt on the web server container.
Inspect Shared File-System
The cdash-persist folder is attached to your Omeka server as a Bind Mount which means that the files inside this directory are not destroyed when your docker app is turned off or erased. In production, cdash-persist is a file share in the Azure cloud. In our new development environment, these resources are in our file-system. You can see them in your local cdash-dev folder.
CDASH-persist has all the files that you need to customize Omeka and some other resources that are useful for learning php and experimenting with foundation concepts of Omeka like the basic Laminas and Doctrine tutorials.
Look Around on the Unix Console
YOu can launch a terminal window on your Omeka server either frm your cloud host or through docker desktop. At this point, it would be good to open up a shell and look around your Omeka installation.
Once you are there, you should be able to verify that the folders cdash-persist and php-tut are mounted on /var/www/html. Try using your computer's file manager to create a new file in one of those folders, and observe that the new file shows up on your dev container, and vice versa. In case anything needs troubleshooting with the installation, you may need to use this shell to change permission on your files directory in your cdash-persist folder.
Inspect and Set Up your MySQL Database
Almost all of the changes that you might make to your Omeka site are stored in the Omeka tablespace in your MySQL database. The Omeka developer will need to know how to get to this database to set up the initial Omeka tablespace, to export a backup of an existing tablespace or import one.
On a local docker installation using our template, you will use Adminer to manage your database. On a cloud host, you would probably use the SQL Workbench client. If you are using a cloud host, you will need to set up your local SQL Workbench to access your MYSQL database. You should vind connnection information on your cloud portal.
We will discuss the Adminer adminstration here and leave it to you to translate to whatever adminstrative client and cloud host you might be using if you have a different set up.
Log in to Adminer
To start Adminer, invoke it in your browser at
http>//localhost:8080
Your credentials are:
- system: MySql
- server: db
- Username: root
- password: blabla
- database: leave blank
If you forgot these, you would find them as part of the Adminer configuration spelled out in the docker-compose.yml file.
The MySQL database is persistent between installations of Omeka. So if you have already been working on an installation, you will find the Omeka tablespace already made, and there wil be a bunch of tables in it -- which you can explore.
If you want to restore an installation saved from a previous SQL dump of the Omeka tablespace, you can drop the Omeka tablespace, and re-create it using the SQL commands below. Then import the previously saved tables.
In some situations, you may want to have alternate table-spaces in MySQL with different names. If this is the case, you can modify the SQL commands below to use whatever name you want, and then change your config/database.ini file to direct your Omeka installation to look at the alternate database.
To create an initial Omeka database in MySql. You can do this by running the following SQL statement at the SQL Prompt.
    CREATE USER 'omeka'@'%' IDENTIFIED BY 'blabla';
    SELECT CURRENT_USER();
    CREATE DATABASE omeka;
    USE omeka;
    GRANT ALL PRIVILEGES ON omeka.* to 'omeka';
    FLUSH PRIVILEGES;
With this tablespace built, you can now import tables that you may have exported form a previous installation of Omeka. When exporting an Omeka tablespace we always use the Use option so that we can import the tables into an alternatively named table-space in case we need to have more than one in our MySQL installation.
Start Omeka
Now its time to start Omeka. Point your web browser to http://localhost/omeka-s/admin. In some cases, it may complain that your files directory does not have the proper permissions/ If you get this, you wil lneed to go into your Omeka container with the command shell, go to the chc-persist files, which ought to be mounted at /var/www/html/persist or something like that and use chmod a+rw files.
If you are starting with an empty tablespace, you will be asked to enter an initial admin user and password. For development we will use:
- Email: admin@devnull.net
- Password: blabla
Building the CDASH demo
To build CDASH involves loading several modules, configuring the custom schema with item templates and custom vocabulary, creating the cdash theme, and loading several items. All of this work would be tedious to have to repeat. Luckily the way Omeka works is that the result of all of these actions is saved in the Omeka database on the MySQL server.
Install Modules
Use the Omeka Admin interface to install of the modules that were included in your omeka-s modules folder.
Notice that on the development version of Omeka, we have put the modules folder into chcpersist so that we can play with them without always having to create a new image of our container each time. On the production version of Omeka-s, the modules folder is part of the image, since this seems to substantially speed up performance of Omeka.
Install CDASH Custom Metadata Terms
CDASH has defined several special metadata terms for properties that are unique to CDASH. These are imported from chcoffline/vocabulary/cdash-terms_20231231.ttl. Choose the version with the latest date. Take a look at the file in your text editor if you like. Then use omeka-s/admin/vocabulary page yo import your Custom CDASH Terms. Use the following parameters to make sure that your terms match with the resource templates that we are going to import next.
- Label: "CDASH Terms"
- Prefix: "cdash"
- Namespace URL: "http://github.com/c-dash/ns/cdash/"
Install CDASH Resource Templates
The Omeka Resource Templates are imported and exported through the omeka-s/admin/resource-template window. Whenever you make shenges to resource templates, they should be exported to the folder, chc-offline/vocabularies/resource_templates. Depending on whether you are working in Dev or Prod. You can find the most recent export files for Places and Documents there, and import them.
Set up Value Suggest
Add value suggest to Creator, and Subject, Building Styles, Buildnig Materiaal
Set up CDASH Site Metadata Browse
IsPartOf (folder)
Set Up Vocabularies (pick lists)
Create Item Groups for Places and Documents
CDASH defines two basic types of Omeka items: CDASH Places, and CDASH Documents Before you can start importing items you need to set up these item sets using the admin/item-sets dialog. The key thing to get right here is that the Title property for each item set should be CDASH Places and CDASH Documents, respectively.
Import Items and Media
ANother page is going to cover how to import items and media.
Check all of the item / schema features and relationships: item-Sets, multi-value subjects and uses, etc.
Create the CDASH Site.
Add the CDASH Site and make it Your Default Site
Use the cdash-phoenix theme.
Define Resource Query for CDASH
Add all items
Configure Resource Pages for CDASH Theme
Values, Media Embeds, Linked Resources, Mapping.
Eveb though the maps do not appear on item pages because of a theme modification, including the Mapping block here adds coordinate infomration to each item page, which uis necessary for highlighting the location in the CDASH Map.Check and Troubleshoot CDASH Features
Turn on your Browser's Developer Tools
The CDASH theme writes useful commentary in the dveloper console.
CDASH Spots don't show up on the Map?
Check out cdash/assets/php/placemarkers.php
Set Up the CDASH Search form
What is special about the CDASH search functions
Check the query in cdash/view/common/search.php
This query will ned to be updated manually for each new instance of CDASH. See comments in the code for more detailed instructions.
Check the Place - Document Information Exchange Function
to be described on the CDASH Manager Tutorial Page
Save an Empty CDASH Instance as a Database Dump
Everything we have done in this tutorial so far has created an empty CDASH instance using the latest Omeka-s version. Now we can freeze this as a dump of the Omeka table-space.
Your export options should be as pictured in the screenshot :
![]()
The Create option is used because we want to keep the option of having more than one database (tablespace) in a given MySQL server. We will talk more about this in a future section on importing an empty CDASH instance. Name the file cdash_4.0.4.CDASH_Empty_20240126.SQL.gz
Updating CDASH for newer versions of Omeka-S
Assemble updated modules
Prepare new Docker container image.